

Create Single Users
Section titled “Create Single Users”
1. Access the Admin Panel
Section titled “1. Access the Admin Panel”Log in with your administrator credentials.
Once logged in, you will see the main dashboard that provides access to various management sections.
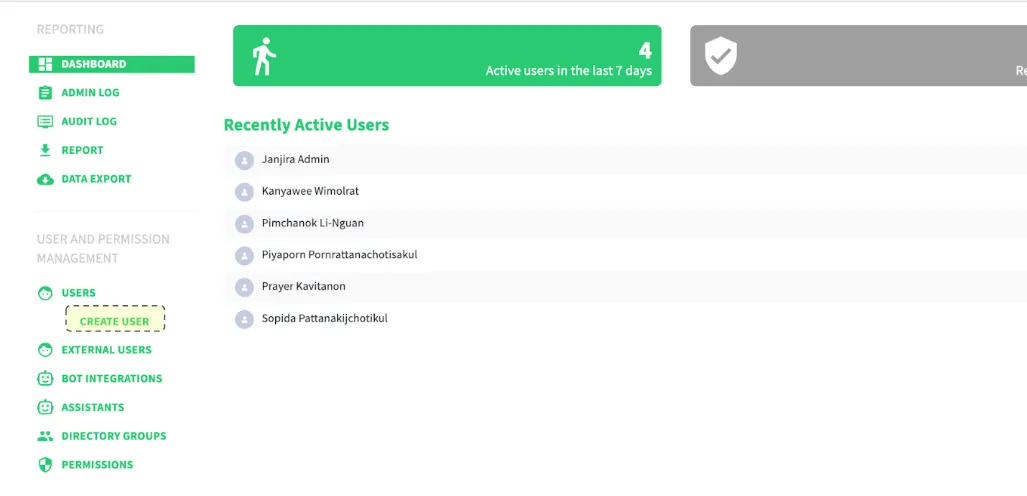
2. Navigate to “User and Permission Management”
Section titled “2. Navigate to “User and Permission Management””In the left-hand menu, find the section labeled “USER AND PERMISSION MANAGEMENT.”
Click on “Create User” to open the user setup page.
3. Fill Out New User Information
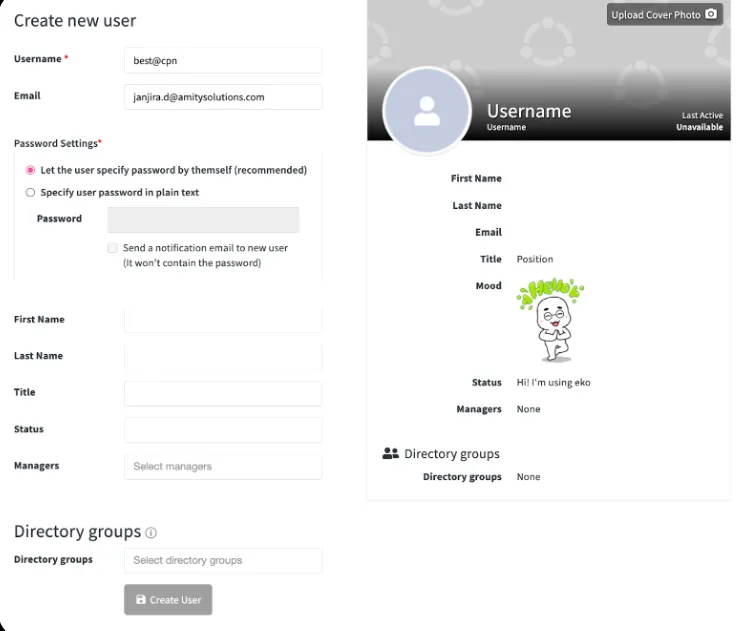
Section titled “3. Fill Out New User Information”You will be redirected to the “Create New User” page.
Here, complete all required fields (marked with “*”) such as:
- Full Name
- Username
- Email Address
4. Set User Password Options
Section titled “4. Set User Password Options”You can choose one of two options for password setup:
Option 1 — Allow User to Create Their Own Password
Section titled “Option 1 — Allow User to Create Their Own Password”Select “Let the user specify password by themself.”
→ The system will send an email prompting the user to create their own password.
Option 2 — Specify Password Manually
Section titled “Option 2 — Specify Password Manually”Select “Specify user password in plain text”
→ Enter a password for the new user.
→ The user can later change it after logging in.
⚠️ Important: Ensure the “Email” field is filled in if the user needs to receive a password setup email.
5. Finalize User Creation
Section titled “5. Finalize User Creation”After verifying all details:
- Click “Create User” at the bottom of the form.
- The new user will appear in the user list once successfully created.
Mass User Upload (Import CSV)
Section titled “Mass User Upload (Import CSV)”Administrators can upload a .csv file to create multiple users at once.
Step 1: Access the Admin Panel
Section titled “Step 1: Access the Admin Panel”Log in to the Admin Panel as an administrator.
Step 2: Open the Bulk Upload Feature
Section titled “Step 2: Open the Bulk Upload Feature”Go to the “Users” menu and select “Upload Multiple Users.”
Step 3: Upload Your CSV File
Section titled “Step 3: Upload Your CSV File”Upload a .csv file containing user details.
The required fields in the CSV are:
usernameemail
Step 4: Processing and Notifications
Section titled “Step 4: Processing and Notifications”Once the mass upload completes:
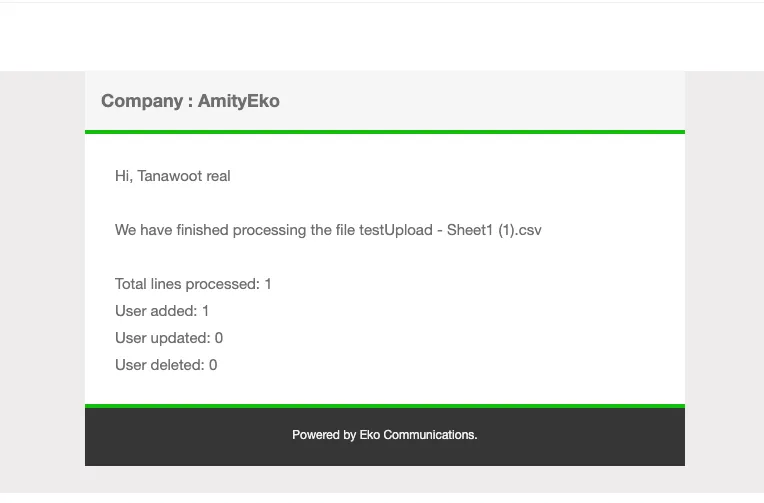
- The admin will receive an email notification confirming successful upload.
- Each created user will receive an email to set up their password (if their email address is valid).
Special Case — Users Without an Email
If a user doesn’t have a valid email address:
- Use a dummy email (e.g.,
[email protected]) in the CSV file. - Include a password in the upload file to allow login without email confirmation.
⚠️ Note: Dummy emails should follow a consistent format for easy identification and maintenance.
All users, for whom you didn’t specify the password in the file, will receive an email with a set password link in any case
Was this page helpful?
Thank you for your feedback!